Showing posts with label UNfail. Show all posts

Tuesday, May 7, 2013

Cupcake Cones - the UNfail

I'm telling you guys, all this baking is not helping me *one bit* on my weight loss journey. That said, I'm still gonna do it.

I decided to use chocolate cake with a whipped cream "frosting."

CONES...FILLED & BAKED

First up, I decided that mini muffin tins would hold the cones better, so I loaded them up.


I filled a piping bag with cake batter, cut the tip off, and filled the cones. I got a little lazy near the end so the front left is lacking in the cake department.

Next I popped them in a 350°F oven for 19 minutes. When the timer went off, the skewer came out clean, so they were done.


While they cooled, I whipped up my frosting.

PIPING, SPRINKLING & THE FINISHED PRODUCT
Ingredients:
8 oz heavy whipping cream
1 Tbsp granulated sugar
1 tsp vanilla (I free-poured....I love vanilla!)

Instructions:
Whip until you can pipe it

I piped it on using a star tip.

Sprinkle.

Cherry.

Enjoy.


**Tip: Twist the end of the bag before filling to prevent it from dripping.

They look pretty deceiving, don't they? I'm calling that an UNfail!

Friday, May 3, 2013

Thumbprint Cookies - the UNfail

I made these for a party this weekend. They were (of course) a hit. I used marionberry jam for the filling. Next time I think I will try with the peach/mango/orange jam from Costo.

First I mixed the dough.

Then I rolled little balls, and placed them on the cookie sheet.

I guess I should really call my cookies indexfingerprint cookies though, because I prefer smaller cookies, my thumb would have been too big.

Next I popped them into the 350°F oven for 9 minutes (less time for smaller cookies).

When the timer went off, I took them out, transferred them to a cooling rack, and added the filling.

**Tip: If you are using jam or jelly, pop it into the microwave for 25-30 seconds, it makes it easier to spoon/pipe, and it leaves a nice shiny finish.

They aren't quite as uniform as I (miss OCD) would have liked, but I'm calling that an UNfail!

Tuesday, April 30, 2013

FAIL-proof Pie Crust

I like making pies. From scratch. Completely. Crust included.

I can just picture some of your reactions right now. Pie crusts are mean. They shrink. They burn. They crack. They taunt you.

Not everyone can be a whiz in the kitchen, but I'm here to help.

This is a tried and true, UNfailed recipe. No butter, means no temperature. Shortening doesn't taste as good as butter, but think how gratifying it will be when you show up at your next party or family gathering, with a pie made completely from scratch. Go ahead, picture the look on everyone's faces.

Ingredients:
      4 cups all-purpose flour, lightly spooned into cup
      1 tablespoon sugar
      2 teaspoons salt
      1 3/4 cup vegetable shortening at room temperature (do not use oil, margarine, lard or butter)
      1/2 cup water
      1 tablespoon white or cider vinegar
      1 large egg

Instructions:
In a large bowl, combine flour, sugar and salt. Cut in shortening until crumbly.

In small bowl, beat water, vinegar and egg. Add to flour mixture and stir until all ingredients are moistened. (I hate the word moist!)


Divide dough into 4 parts. Shape each piece into a round flat patty. Wrap each piece with plastic wrap and chill for 30 minutes. 

Dough will keep in refrigerator for 3 days, or in the freezer for up to a month. Thaw before using.

Lightly flour both sides of the dough patty, and roll out onto a lightly floured surface. Aim for 1/8" thick.

Roll dough onto rolling pin to transfer to pan. Smooth bottom, trim edges, and use fingertips to shape edges.


If you are planning on making a cream pie, dock the bottom (make tiny holes) using a fork to prevent the crust from bubbling up. Bake it at 375°F for 10 minutes. This is called blind baking.

If you are going to make a fruit or something like a pumpkin pie, fill and bake according to recipe.

And there you have it, a fail-proof pie crust to delight your family and friends.

Friday, April 26, 2013

Waffle Iron Cookies - the UNfail

I wasn't really sure how this one was going to turn out....but I was really hoping it wouldn't make a HUGE mess. Especially since I was using a brand spankin new waffle iron. Along with an ancient (but sturdy) KitchenAid mixer that used to belong to my grandma.

THE EQUIPMENT

I grew up using this mixer, and I like that I still have access to it, as well as my newer (read cheaper) mixer. Hers was that weird almond color that became popular for appliances in the 70s. Mine, well it's just boring old white.

Anyway....

MIXING THE DOUGH. I USED SPEED 2
I weighed out my flour... (4.5 ozs in a cup ... so 3/4 of a cup = 3.375oz) and added the salt and baking soda.

I measured and packed my brown sugar, and added it to the mixer.

Next I added my melted butter, then eggs, one at a time so they were fully incorporated. And I free-poured the vanilla extract...I LOVE vanilla extract.

Then I added the flour salt and baking soda. Don't worry about getting it completely mixed just yet.


Last up, the oats and the chocolate chips. It didn't look so appetizing at this point...

I dropped about 1 1/2 tablespoons onto each section of the waffle iron, shut the top, flipped it 180° and waited.

Sadly, there was no hilarious mess to clean up. I was actually looking forward to this one failing.

That would be an UNfail folks!


The thicker cookie dough is most likely what makes this pin work. Again, for all you pinners out there, make sure you check the page that accompany your pins. There are tons of great ideas out there, just make sure to follow the recipe laid out for you, instead of just winging it.

Tuesday, April 23, 2013

Rainbow Cake in a Jar - the UNfail

Okay, I'll admit it...I really procrastinated making this post. Why? No idea, I mean, how difficult can it be to layer cake in a jar? Well if you have OCD like I do, it's no cake walk.

Oh, and to make things even better, this will not be a "rainbow" cake, it will be a red/green/purple cake, because one of my four-legged family members insists on carrying my gel colors around in their mouth, and then I never see them again.

First step....CLEAN mason jars.

I mixed up my cake mix according to the directions on the box and divided it into 3 bowls.
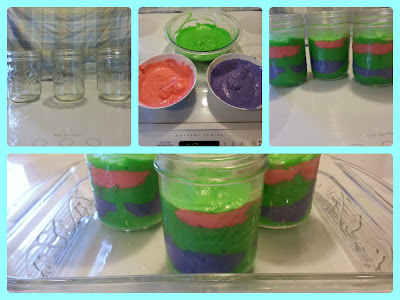
CAKE MIX AND LAYERS
Then I added coloring to each (there is more green so I could separate the layers).

Next, I layered it into my jars (green, purple, green, pink, green), trying to level out each layer by tapping the jar on the counter. That didn't seem to work out so well =(

Once my jars were about 3/4 full (and I was out of cake batter) I placed them in a baking dish and added about 1/2" of water, and popped them in a 350°F oven for 35 minutes.


When the timer went off, I checked them with a skewer, and they weren't quite done, so I gave them another 6 minutes. When the timer went off again, I removed them from the oven and the water bath, and let them cool. The cake shrunk a bit while it was cooling, and I was curious so I decided to dump one out.
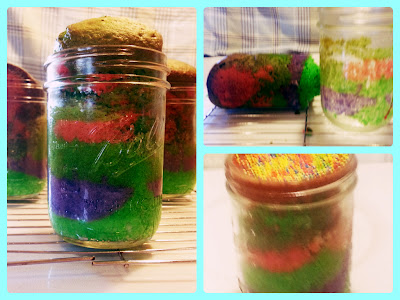
THE FINISHED PRODUCT


The cake did grow above the jars, so next time I think I would use a 4th jar, and only fill them halfway.

After they were completely cooled, I leveled the top and added a little bit of frosting and A LOT of sprinkles.

(UN?)fortunately, I am not eating cake right now, so I used my boyfriend as a guinea pig, he proceeded to eat the contents of the jar in one sitting.


My cakes were fully baked, and they did not ooze all over the outside of the jars or the oven, so I'm going to go ahead and call this an UNfail.

Friday, April 19, 2013

Cookie Cups - the UNfail

It's unFail day here in the kitchen.

I decided I'm going to try both chocolate chip cookie cups and the sugar cookie cups.
My guess is the chocolate chip will fail, as they are usually a drop cookie (they spread as they bake), and the sugar cookie cups...well Wilton made them work, so why can't I?

I skipped the dough mixing process, I figure you all can figure that one out. I used a basic chocolate chip recipe and the sugar cookie recipe from my last post.
Note: The kitchen I was working in has a flat top stove, so I just used it as a work station.

CHOCOLATE CHIP COOKIE CUPS

ROLLED OUT, MOLDED, AFTER 9 MINUTES IN THE OVEN
First I rolled the dough to about 1/8" thick (sorry chef's, no rulers in my kitchen).

I did this using a sheet of wax paper.

Then I had my "helper" (aka mom) spray the outside of the cup with nonstick spray.

Next I took the cookie dough and laid it across the top of the cupcake pan, smoothing out and down the cup.

I trimmed the edges using a butter knife, and popped the whole tray in the freezer for 5 minutes.

5 MINUTES IN THE OVEN, TRIMMED AND COOLED, NAILED IT!


I put it in the oven (with a cookie sheet underneath just in case) at 350°F for 9 minutes to start with.

Good thing I put that cookie sheet down there, it melted down quite a bit. 

When the timer went off, it didn't look done to me, so I put it back in for another 3 minutes. 

When I took it out, I trimmed the edges again, let it cool, and tried to remove the cookie from the mold. 


FAIL. 
I'm not sure if it was the dough, or lack of nonstick spray, but the chocolate chip was a bust.

In keeping with pinterest fail tradition, I added the "NAILED IT!" text to my photo.
Thankfully the sugar cookie cups were much more successful.


SUGAR COOKIE CUPS

IGNORE THE CHOCOLATE MESS ON THAT COOKIE SHEET
After mixing the dough I put it in the freezer for about 20 minutes to chill.

Next I used a lightly floured surface to roll it out to 1/8" thick.

I sprayed the cupcake tins with nonstick spray myself this time (probably overdid it a bit trying to make sure the cups didn't stick).

Again, I laid the dough on the top of the mold, and smoothed/pressed it into place. 

I trimmed the dough around the bottom, and popped the whole tray in the freezer for 5 minutes.
COOKIE CUP + STRAWBERRIES + WHIPPED CREAM = YUM
I removed the tray from the freezer and put it in the oven at 350°F for 11 minutes.

These melted down somewhat, but did not drip like the chocolate chip.

When the timer went off I took them out, I trimmed the edges again and let it cool for 10 minutes.

Then I tried to remove the cookie from the mold.


SUCCESS!
I'm not sure if it was the extra nonstick spray, or the fact that sugar cookies don't usually spread as much as chocolate chip cookies do, but as far as the cookie cups go, I am calling this an UNfail.